New to KubeDB? Please start here.
Kafka QuickStart
This tutorial will show you how to use KubeDB to run an Apache Kafka.
Before You Begin
At first, you need to have a Kubernetes cluster, and the kubectl command-line tool must be configured to communicate with your cluster. If you do not already have a cluster, you can create one by using kind.
Now, install the KubeDB operator in your cluster following the steps here.
To keep things isolated, this tutorial uses a separate namespace called demo throughout this tutorial.
$ kubectl create namespace demo
namespace/demo created

$ kubectl get namespace
NAME                 STATUS   AGE
demo                 Active   9s
Note: YAML files used in this tutorial are stored in guides/kafka/quickstart/overview/yamls folder in GitHub repository kubedb/docs.
We have designed this tutorial to demonstrate a production setup of KubeDB managed Apache Kafka. If you just want to try out KubeDB, you can bypass some safety features following the tips here.
Find Available StorageClass
We will have to provide StorageClass in Kafka CRD specification. Check available StorageClass in your cluster using the following command,
$ kubectl get storageclass
NAME                 PROVISIONER             RECLAIMPOLICY   VOLUMEBINDINGMODE      ALLOWVOLUMEEXPANSION   AGE
standard (default)   rancher.io/local-path   Delete          WaitForFirstConsumer   false                  14h
Here, we have standard StorageClass in our cluster from Local Path Provisioner.
Find Available KafkaVersion
When you install the KubeDB operator, it registers a CRD named KafkaVersion. The installation process comes with a set of tested KafkaVersion objects. Let’s check available KafkaVersions by,
NAME    VERSION   DB_IMAGE                   DEPRECATED   AGE
3.3.0   3.3.0     kubedb/kafka-kraft:3.3.0                6d
Notice the DEPRECATED column. Here, true means that this KafkaVersion is deprecated for the current KubeDB version. KubeDB will not work for deprecated KafkaVersion. You can also use the short from kfversion to check available KafkaVersions.
In this tutorial, we will use 3.3.0 KafkaVersion CR to create a Kafka cluster.
Create a Kafka Cluster
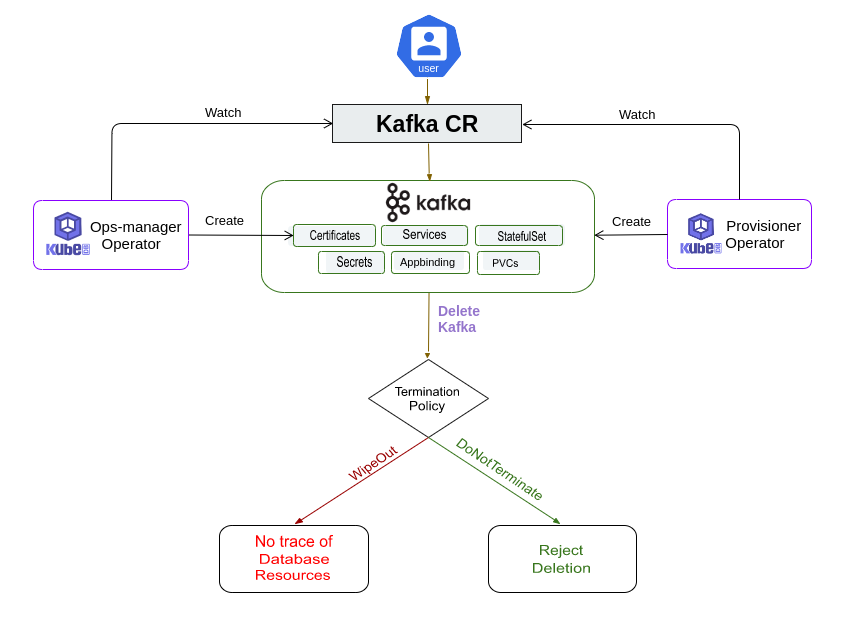
The KubeDB operator implements a Kafka CRD to define the specification of Kafka.
The Kafka instance used for this tutorial:
apiVersion: kubedb.com/v1alpha2
kind: Kafka
metadata:
  name: kafka-quickstart
  namespace: demo
spec:
  replicas: 3
  version: 3.3.0
  storage:
    accessModes:
      - ReadWriteOnce
    resources:
      requests:
        storage: 1Gi
    storageClassName: standard
  storageType: Durable
  terminationPolicy: DoNotTerminate
Here,
spec.version - is the name of the KafkaVersion CR. Here, a Kafka of version 3.3.0 will be created.spec.replicas - specifies the number of Kafka brokers.spec.storageType - specifies the type of storage that will be used for Kafka. It can be Durable or Ephemeral. The default value of this field is Durable. If Ephemeral is used then KubeDB will create the Kafka using EmptyDir volume. In this case, you don’t have to specify spec.storage field. This is useful for testing purposes.spec.storage specifies the StorageClass of PVC dynamically allocated to store data for this Kafka instance. This storage spec will be passed to the StatefulSet created by the KubeDB operator to run Kafka pods. You can specify any StorageClass available in your cluster with appropriate resource requests. If you don’t specify spec.storageType: Ephemeral, then this field is required.spec.terminationPolicy specifies what KubeDB should do when a user try to delete Kafka CR. Termination policy Delete will delete the database pods, secret and PVC when the Kafka CR is deleted.
Note: spec.storage section is used to create PVC for database pod. It will create PVC with storage size specified in the storage.resources.requests field. Don’t specify limits here. PVC does not get resized automatically.
Let’s create the Kafka CR that is shown above:
$ kubectl apply -f https://github.com/kubedb/docs/raw/v2023.12.28/docs/guides/Kafka/quickstart/overview/yamls/kafka.yaml
kafka.kubedb.com/kafka-quickstart created
The Kafka’s STATUS will go from Provisioning to Ready state within few minutes. Once the STATUS is Ready, you are ready to use the Kafka.
$ kubectl get kafka -n demo -w
NAME               TYPE                  VERSION   STATUS   AGE
kafka-quickstart   kubedb.com/v1alpha2   3.3.0     Provisioning   2s
kafka-quickstart   kubedb.com/v1alpha2   3.3.0     Provisioning   4s
.
.
kafka-quickstart   kubedb.com/v1alpha2   3.3.0     Ready          112s
Describe the kafka object to observe the progress if something goes wrong or the status is not changing for a long period of time:
$ kubectl describe kafka -n demo kafka-quickstart
Name:         kafka-quickstart
Namespace:    demo
Labels:       <none>
Annotations:  <none>
API Version:  kubedb.com/v1alpha2
Kind:         Kafka
Metadata:
  Creation Timestamp:  2023-01-04T10:13:12Z
  Finalizers:
    kubedb.com
  Generation:  2
  Managed Fields:
    API Version:  kubedb.com/v1alpha2
    Fields Type:  FieldsV1
    fieldsV1:
      f:metadata:
        f:annotations:
          .:
          f:kubectl.kubernetes.io/last-applied-configuration:
      f:spec:
        .:
        f:healthChecker:
          .:
          f:failureThreshold:
          f:periodSeconds:
          f:timeoutSeconds:
        f:replicas:
        f:storage:
          .:
          f:accessModes:
          f:resources:
            .:
            f:requests:
              .:
              f:storage:
          f:storageClassName:
        f:storageType:
        f:terminationPolicy:
        f:version:
    Manager:      kubectl-client-side-apply
    Operation:    Update
    Time:         2023-01-04T10:13:12Z
    API Version:  kubedb.com/v1alpha2
    Fields Type:  FieldsV1
    fieldsV1:
      f:metadata:
        f:finalizers:
          .:
          v:"kubedb.com":
      f:spec:
        f:authSecret:
    Manager:      kubedb-provisioner
    Operation:    Update
    Time:         2023-01-04T10:13:12Z
    API Version:  kubedb.com/v1alpha2
    Fields Type:  FieldsV1
    fieldsV1:
      f:status:
        .:
        f:conditions:
        f:phase:
    Manager:         kubedb-provisioner
    Operation:       Update
    Subresource:     status
    Time:            2023-01-04T10:13:14Z
  Resource Version:  192231
  UID:               8a1eb48b-75f3-4b3d-b8ff-0634780a9f09
Spec:
  Auth Secret:
    Name:  kafka-quickstart-admin-cred
  Health Checker:
    Failure Threshold:  3
    Period Seconds:     20
    Timeout Seconds:    10
  Pod Template:
    Controller:
    Metadata:
    Spec:
      Resources:
        Limits:
          Memory:  1Gi
        Requests:
          Cpu:     500m
          Memory:  1Gi
  Replicas:        3
  Storage:
    Access Modes:
      ReadWriteOnce
    Resources:
      Requests:
        Storage:         1Gi
    Storage Class Name:  standard
  Storage Type:          Durable
  Termination Policy:    DoNotTerminate
  Version:               3.3.0
Status:
  Conditions:
    Last Transition Time:  2023-01-04T10:13:14Z
    Message:               The KubeDB operator has started the provisioning of Kafka: demo/kafka-quickstart
    Observed Generation:   2
    Reason:                DatabaseProvisioningStartedSuccessfully
    Status:                True
    Type:                  ProvisioningStarted
    Last Transition Time:  2023-01-04T10:13:20Z
    Message:               All desired replicas are ready.
    Observed Generation:   2
    Reason:                AllReplicasReady
    Status:                True
    Type:                  ReplicaReady
    Last Transition Time:  2023-01-04T10:13:52Z
    Message:               The Kafka: demo/kafka-quickstart is accepting client requests
    Observed Generation:   2
    Reason:                DatabaseAcceptingConnectionRequest
    Status:                True
    Type:                  AcceptingConnection
    Last Transition Time:  2023-01-04T10:15:00Z
    Message:               The Kafka: demo/kafka-quickstart is ready.
    Observed Generation:   2
    Reason:                ReadinessCheckSucceeded
    Status:                True
    Type:                  Ready
    Last Transition Time:  2023-01-04T10:15:02Z
    Message:               The Kafka: demo/kafka-quickstart is successfully provisioned.
    Observed Generation:   2
    Reason:                DatabaseSuccessfullyProvisioned
    Status:                True
    Type:                  Provisioned
  Phase:                   Ready
Events:                    <none>
KubeDB Operator Generated Resources
On deployment of a Kafka CR, the operator creates the following resources:
$ kubectl get all,secret -n demo -l 'app.kubernetes.io/instance=kafka-quickstart'
NAME                     READY   STATUS    RESTARTS   AGE
pod/kafka-quickstart-0   1/1     Running   0          8m50s
pod/kafka-quickstart-1   1/1     Running   0          8m48s
pod/kafka-quickstart-2   1/1     Running   0          8m46s

NAME                            TYPE        CLUSTER-IP   EXTERNAL-IP   PORT(S)                       AGE
service/kafka-quickstart-pods   ClusterIP   None         <none>        9092/TCP,9093/TCP,29092/TCP   8m52s

NAME                                READY   AGE
statefulset.apps/kafka-quickstart   3/3     8m50s

NAME                                                  TYPE               VERSION   AGE
appbinding.appcatalog.appscode.com/kafka-quickstart   kubedb.com/kafka   3.3.0     8m50s

NAME                                 TYPE                       DATA   AGE
secret/kafka-quickstart-admin-cred   kubernetes.io/basic-auth   2      8m52s
secret/kafka-quickstart-config       Opaque                     2      8m52s
StatefulSet - a StatefulSet named after the Kafka instance. In topology mode, the operator creates 3 statefulSets with name {Kafka-Name}-{Sufix}.Services - For a combined Kafka instance only one service is created with name {Kafka-name}-{pods}. For topology mode, two services are created.
{Kafka-Name}-{broker} - the governing service which is used for inter-broker communications. This service is also used to connect to the brokers with external clients. This is a headless service.{Kafka-Name}-{controller} - the governing service which is used for inter-controller communications. It is a headless service too.
AppBinding - an AppBinding which hold to connect information for the Kafka brokers. It is also named after the Kafka instance.Secrets - 3 types of secrets are generated for each Kafka cluster.
{Kafka-Name}-{username}-cred - the auth secrets which hold the username and password for the Kafka users. Operator generates credentials for admin user if not provided and creates a secret for authentication.{Kafka-Name}-{alias}-cert - the certificate secrets which hold tls.crt, tls.key, and ca.crt for configuring the Kafka instance.{Kafka-Name}-config - the default configuration secret created by the operator.
Publish & Consume messages with Kafka
We will use kafka console producer and kafka console consumer for creating kafka topic, publishing messages to kafka brokers and then consume those messages as well. Exec into one of the kafka brokers in interactive mode first, then navigate to HOME directory which is at path /opt/kafka
$ kubectl exec -it -n demo  kafka-quickstart-0 -- bash
root@kafka-quickstart-0:/# cd $HOME
root@kafka-quickstart-0:~# pwd
/opt/kafka
root@kafka-quickstart-0:~#
You will find a file named clientauth.properties in the config directory. This file is generated by the operator which contains necessary authentication/authorization configurations that are required during publishing or subscribing messages to a kafka topic.
root@kafka-quickstart-0:~# cat $HOME/config/clientauth.properties
sasl.jaas.config=org.apache.kafka.common.security.plain.PlainLoginModule required username="admin" password="lJEKu_!Rsf31L;tU";
security.protocol=SASL_PLAINTEXT
sasl.mechanism=PLAIN
Now, we have to use a bootstrap server to perform operations in a kafka broker. For this demo, we are going to use the FQDN of the headless service for the kafka brokers with default port for the brokers which is kafka-quickstart-pods.demo.svc.cluster.local:9092. We will set an environment variable for the clientauth.properties filepath as well.
root@kafka-quickstart-0:~# export SERVER="kafka-quickstart-pods.demo.svc.cluster.local:9092"
root@kafka-quickstart-0:~# export CLIENTAUTHCONFIG="$HOME/config/clientauth.properties"
Let’s describe the broker metadata for the quorum.
root@kafka-quickstart-0:~# kafka-metadata-quorum.sh --command-config $CLIENTAUTHCONFIG --bootstrap-server $SERVER describe --status
ClusterId:              11ed-8dd1-2e8877e5897w
LeaderId:               2
LeaderEpoch:            79
HighWatermark:          125229
MaxFollowerLag:         0
MaxFollowerLagTimeMs:   134
CurrentVoters:          [0,1,2]
CurrentObservers:       []
It will show you important metadata information like clusterID, current leader ID, broker IDs which are participating in leader election voting and IDs of those brokers who are observers. It is important to mention that each broker is assigned a numeric ID which is called its broker ID. The ID is assigned sequentially with respect to the host pod name. In this case, The pods assigned broker IDs are as follows:
| Pods |
Broker ID |
| kafka-quickstart-0 |
0 |
| kafka-quickstart-1 |
1 |
| kafka-quickstart-2 |
2 |
Let’s create a topic named quickstart-topic with 3 partitions and a replication factor of 3. Describe the topic once it’s created. You will see the leader ID for each partition and their replica IDs along with in-sync-replicas(ISR).
root@kafka-quickstart-0:~# kafka-topics.sh --command-config $CLIENTAUTHCONFIG --create --topic quickstart-topic --partitions 3 --replication-factor 3 --bootstrap-server $SERVER
Created topic quickstart-topic.

root@kafka-quickstart-0:~# kafka-topics.sh --command-config $CLIENTAUTHCONFIG --describe --topic quickstart-topic --bootstrap-server $SERVER
Topic: quickstart-topic	TopicId: E6IUqUQJQICCVqKREfVQ1Q	PartitionCount: 3	ReplicationFactor: 3	Configs: segment.bytes=1073741824
	Topic: quickstart-topic	Partition: 0	Leader: 1	Replicas: 1,2,0	Isr: 1
	Topic: quickstart-topic	Partition: 1	Leader: 2	Replicas: 2,0,1	Isr: 2
	Topic: quickstart-topic	Partition: 2	Leader: 0	Replicas: 0,1,2	Isr: 0
Now, we are going to start a producer and a consumer for topic quickstart-topic using console. Let’s use this current terminal for producing messages and open a new terminal for consuming messages. Let’s set the environment variables for bootstrap server and the configuration file in consumer terminal also.
From the topic description we can see that the leader partition for partition 2 is 0 (the broker that we are on). If we produce messages to kafka-quickstart-0 broker(brokerID=0) it will store those messages in partition 2. Let’s produce messages in the producer terminal and consume them from the consumer terminal.
root@kafka-quickstart-0:~#  kafka-console-producer.sh --producer.config $CLIENTAUTHCONFIG  --topic quickstart-topic --request-required-acks all --bootstrap-server $SERVER
>message one
>message two
>message three
>
root@kafka-quickstart-0:/# kafka-console-consumer.sh --consumer.config $CLIENTAUTHCONFIG --topic quickstart-topic --from-beginning --bootstrap-server $SERVER --partition 2
message one
message two
message three
Notice that, messages are coming to the consumer as you continue sending messages via producer. So, we have created a kafka topic and used kafka console producer and consumer to test message publishing and consuming successfully.
Cleaning up
To clean up the Kubernetes resources created by this tutorial, run:
$ kubectl patch -n demo kafka kafka-quickstart -p '{"spec":{"terminationPolicy":"WipeOut"}}' --type="merge"
kafka.kubedb.com/kafka-quickstart patched

$ kubectl delete kf kafka-quickstart  -n demo
kafka.kubedb.com "kafka-quickstart" deleted

$  kubectl delete namespace demo
namespace "demo" deleted
Tips for Testing
If you are just testing some basic functionalities, you might want to avoid additional hassles due to some safety features that are great for the production environment. You can follow these tips to avoid them.
- Use
storageType: Ephemeral. Databases are precious. You might not want to lose your data in your production environment if the database pod fails. So, we recommend to use spec.storageType: Durable and provide storage spec in spec.storage section. For testing purposes, you can just use spec.storageType: Ephemeral. KubeDB will use emptyDir for storage. You will not require to provide spec.storage section.
- Use
terminationPolicy: WipeOut. It is nice to be able to resume the database from the previous one. So, we preserve all your PVCs and auth Secrets. If you don’t want to resume the database, you can just use spec.terminationPolicy: WipeOut. It will clean up every resource that was created with the Elasticsearch CR. For more details, please visit here.
Next Steps